Post types, series and code
A release, an incident note or a TIL is a Ghost post with a template and an internal tag, a series is a tag whose slug starts with series-, and code options go after the language in the code card.
Ghost has one kind of post. Logbuch tells a release from an incident note or a short TIL by two things you set in the post settings: the template decides how the post itself looks, and an internal tag tells every list, feed and home page layout what kind of entry it is. A post with only one of the two still looks finished, but lists then show your release as an ordinary post, so set both.
You find both in the post settings: in the editor, click Settings (the panel icon at the top right). Tags and Excerpt are near the top of the panel, Template further down.
The post types
| Type | Template | Internal tag | Lists show it as |
|---|---|---|---|
| Post | Default | none | Post |
| Tutorial chapter | Default | none, but a series tag | Tutorial |
| Release | Changelog | #changelog | Changelog |
| Incident note or postmortem | Incident | #incident | Incident |
| Short note | Til | #til | TIL |
| Newsletter issue | Newsletter | #newsletter | Letter |
To make a post a release, for example:
- In the post settings, choose Changelog under Template. Ghost names each template after its file, which is why the TIL template appears as Til.
- In Tags, type
#changelogand press Enter. A tag that starts with#is internal: readers never see it, and it has no page of its own. Add public tags before or after it as you like, such as the project's name.
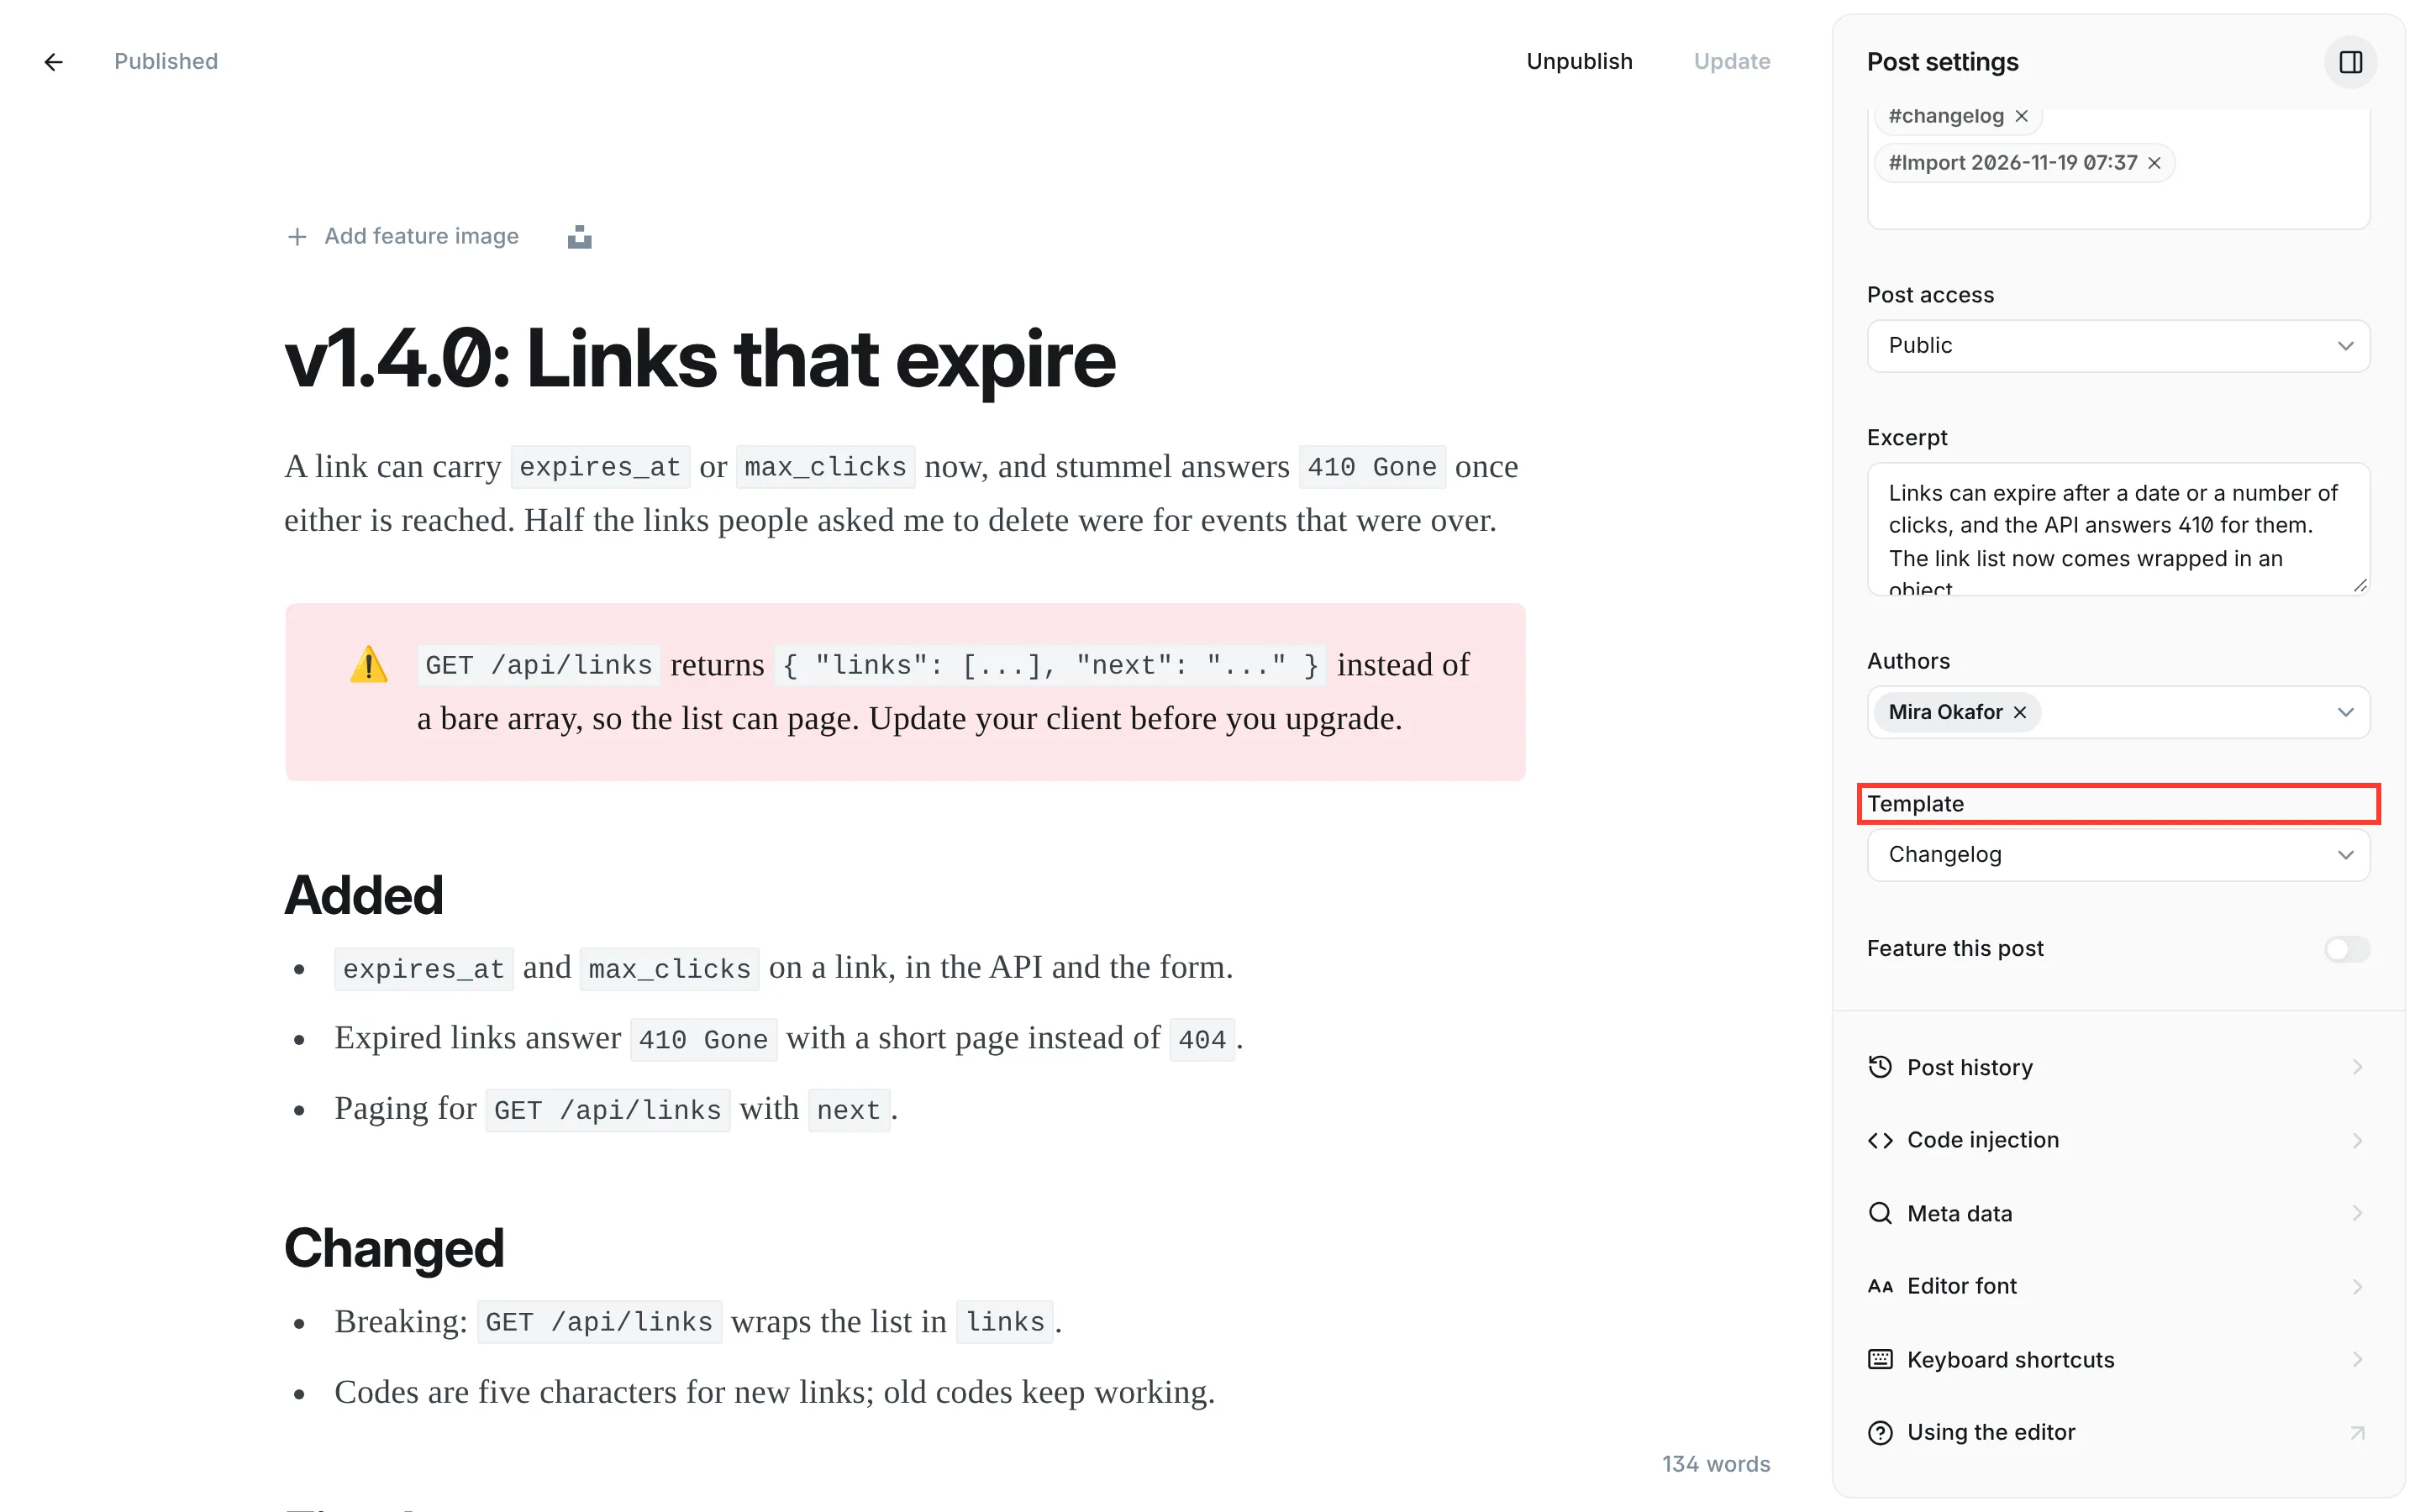
The demo content has every type filled in. The Changelog demo is the quickest way to see releases and incidents side by side.
Changelog
A release is a post with the Changelog template and the internal tag #changelog. Write the version at the start of the title, followed by a colon:
v0.9.0: Checks from two places
The theme shows the part before the colon as a version mark above the title and the rest as the title. The v is optional, and a pre-release such as v1.0.0-beta.2 works too. A title without a version shows no mark. Under the title, the meta line gives the date, the reading time and "Upgrade from v0.8.x", taken from the version of the release published before this one.
Breaking changes
Put a breaking change into a callout card and make it red: type /callout on an empty line, choose Callout and pick the red colour. In a release, the red callout gets the label "Breaking change" and a rule in the keyword colour. Place it right after the opening paragraph, so readers see it before they upgrade.
Sections
Logbuch reads the sections of Keep a Changelog: a heading with one of the six names, directly followed by a bulleted or numbered list.
## Added
- `[[probe]]` in `pegel.toml` and the command `pegel probe`.
- Intervals below one minute, down to 10 seconds.

## Changed
- Breaking: `interval` is in seconds.
Each heading becomes a framed label in its own colour with the number of its items. An item that starts with the word "Breaking" gives its section a "breaking" mark. Use H2 headings when they follow the opening paragraph, so the heading order stays right for screen readers. H3 works as well.
The heading has to be the name alone, with no colon or other words, but it can be in any of the theme's five languages:
| Section | English | German | Spanish | French | Italian |
|---|---|---|---|---|---|
| Added | Added | Hinzugefügt | Añadido, Agregado | Ajouté | Aggiunto |
| Changed | Changed | Geändert | Cambiado | Modifié | Modificato |
| Deprecated | Deprecated | Veraltet | Obsoleto | Déprécié | Deprecato |
| Removed | Removed | Entfernt | Eliminado | Supprimé | Rimosso |
| Fixed | Fixed | Behoben | Corregido, Arreglado | Corrigé | Corretto, Risolto |
| Security | Security | Sicherheit | Seguridad | Sécurité | Sicurezza |
Other headings, such as "Upgrading from 0.8.x", stay plain headings. In lists, a release shows its version after the title and a count per section, "4 added", "1 fixed", plus the number of breaking changes. If no item starts with "Breaking", each red callout counts as one.
Incident
An incident note is a post with the Incident template, the internal tag #incident, and two more internal tags:
| What | Internal tags |
|---|---|
| Status | #investigating, #identified, #monitoring, #resolved |
| Severity | #minor, #major, #critical |
Under the title, a row of facts shows the status in its colour, the severity, the start, the end and the duration. As the incident goes on, swap the status tag: remove #investigating and add #identified, and so on until #resolved. If a post carries more than one status tag, the furthest one wins, so #resolved beats the others.
The timeline
Start, end and duration come from a timeline that you write as a bulleted or numbered list. Every item starts with a time, the first one with a date as well:
- 2026-11-09 18:04 CET The release job publishes v0.9.0.
- 2026-11-10 06:52 Investigating: A reader reports that pegel upgrade stops with "checksum mismatch".
- 07:10 Identified: The checksum file was written during the second build.
- 07:25 New SHA256SUMS uploaded.
- 07:31 Monitoring: Two community packages still carry the old file.
- The date is written
2026-11-10, the time on the 24-hour clock,07:10. An item with a time only takes the date of the item before it. - A time zone in capitals,
CETorUTC, can follow the time. Later items keep it. Write every time in the same zone, because the duration is worked out from the times as you typed them. - A status word with a colon after the time marks the item in that status's colour:
Investigating:,Identified:,Monitoring:orResolved:, in English or in your site's language. Items without one get an open dot. - The duration runs from the first item to the last one marked
Resolved:. Until there is one, the facts show the start only.
The theme takes the first list in the post that has at least two items, starts every item with a time and opens with a date. The timeline is drawn with a day line wherever the date changes and the time beside each item. Lists show an incident with its status, severity and duration.
TIL
A TIL is a short note: one command, one flag, one thing that surprised you. Choose Til under Template and add the internal tag #til.
The note opens with its date, time and time zone and the TIL label, then the title and the text. At the end, it links the older and the newer TIL, so readers can page through your notes. Keep them short: every list shows a TIL in full, code included, instead of an excerpt. With the Tutorials first layout, the five newest also appear in a column of their own on the home page.
Newsletter
A newsletter issue you also publish on the site looks best with the Newsletter template and the internal tag #newsletter. The page then reads like a letter: "Newsletter" and the date above the title, then the author and reading time, the text, and at the end a box with "Get the next letter by mail" for readers who aren't members yet. Lists label it "Letter" and number your issues, "Letter 9".
This changes only the page on your site. The e-mail itself always comes from Ghost (see Newsletter design below).
Video in the head of a post
The Video Header template puts a video where the feature image would be: the title, the excerpt and the meta line come first, then the video, wider than the text.
- Add the video to the post: type
/videoon an empty line, choose Video and pick the file. - In the post settings, choose Video Header under Template.
- Publish or update the post.
The first video of the post moves into the head and no longer shows in the text. Its caption moves with it. Keep the feature image: lists, shared links and the newsletter show it, because they can't show a video, and readers see it in the head of a post that has no video.
A video that plays on its own. Click the video in the editor, open its settings from the small toolbar above it and switch on Loop. It then starts on its own, without sound, and begins again when it ends. Readers get a button in its corner to pause it. For readers who have set their device to reduce motion, it waits until they press play. A looping video starts to load with the page, so keep it to a few seconds.
On a post for members only, a visitor who isn't signed in sees the part above the public preview line. If the video is below that line, they see the feature image in the head. Put the video above the line if everyone should see it.
Pages and page variants
Pages get two templates of their own:
- Wide spreads the title and excerpt across the width of the code band. Good for a page that you build from wide cards, such as a
/usespage full of images. - Landing centres the title and excerpt above your content. Good for an about page or a project's front page.
Neither shows a date, an author or a feature image, and neither has comments or links to the next entry, so use them for pages, not for posts. Both respect Show title and feature image in the page settings: switch it off, and the page starts with your content.
Series
A series turns posts into chapters of a tutorial: a rail with every chapter beside the text, "Chapter 3 of 6" above the title, and previous and next that follow the series instead of the date.
A series is a public tag whose slug starts with series-:
- Write the first chapter. In Tags, type the series' name, for example
A tiny HTTP server in TypeScript, and press Enter. - Save the post, then open Tags → the tag → Slug and change the slug so it starts with
series-, for exampleseries-tiny-http-server. Save it. - Give the tag a description there too. It appears on the series' course page and its card on the home page.
- Add the same tag to every chapter after it.
The chapters follow their publication date, oldest first. To move a chapter, change its publish date. Give each post one series tag only.
The prefix series- is the setting Series prefix in Settings → Site → Design & branding → Customize → Theme (see Custom settings). If your tags already follow another pattern, change the setting instead of the tags.
What readers see
- On wide screens the series stands as a rail left of the text: every chapter with its number, the current one set off, the total reading time and a progress bar. On narrower screens it becomes a box above the title.
- Under the bar, a checkbox "Remember the chapters I have read". Nothing is stored until a reader ticks it. Then their browser keeps which chapters they've read, a chapter counting once its end comes into view, and read chapters get a check mark. Unticking it deletes what was stored. Nothing is sent to your site or anywhere else, which matters for your privacy policy (see Self-hosting).
- The series tag's page, for example
/tag/series-tiny-http-server/, is the course page: the title and description, the number of chapters and the reading time, every chapter with its excerpt, a button "Start with chapter 1" (or "Continue with chapter 3" once a reader keeps their progress), and the series' RSS feed. - The footer lists your five newest series. With the Tutorials first layout, the home page shows up to six as cards.
Code
Logbuch reads everything about a code block from Ghost's own code card. Type /code on an empty line and choose Code. The card has a field for the language, and that field takes more than the language: after it, separated by spaces, come the options.
ts file=src/router.ts collapse
The block then runs as a band wider than the text, with a line of facts below it: the file name, the number of added and removed lines, the language and a Copy button.
| Option | What it does | Example |
|---|---|---|
file= | shows the file name under the block, the folder quiet and the name in bold | ts file=src/router.ts |
collapse | folds a block of 14 lines or more to 10, with a button "Show all 31 lines" | yaml file=compose.yaml collapse |
wrap | breaks long lines instead of scrolling sideways | toml file=pegel.toml wrap |
tab= | turns code cards in a row into one block with tabs (below) | console tab=pnpm |
diff | colours the output of git diff | diff file=/etc/default/grub |
diff-ts | a diff in the colours of a language: start each line with +, - or a space | diff-toml file=pegel.toml |
console | a terminal session: lines that start with $ are commands, the rest is output | console |
The language always comes first. For a file with no highlighting, write text, for example text file=/etc/exports. File names and tab names can't contain spaces.
Marked, added and removed lines
To mark single lines in ordinary code, put a comment at the end of the line, in the comment style of its language:
const port = Number(process.env.PORT ?? 8080); // [!code highlight]
const host = '0.0.0.0'; // [!code --]
const host = '127.0.0.1'; // [!code ++]
// [!code ++] shows an added line in green with a +, // [!code --] a removed line in red with a −, and // [!code highlight] marks a line in yellow. In YAML, TOML or a shell script, write # [!code ++]. The comments themselves don't show. In a diff, a removed line followed by an added one underlines the words that changed.
Tabs
Code cards with tab= that follow each other directly become one block with a row of tabs, one per card:
console tab=pnpm
console tab=npm
console tab=yarn
When a reader picks a tab, every other block on the page with the same tab switches too, and their browser remembers the choice until they close the browser tab.
Copy
The Copy button takes the code without line numbers or markers. From a terminal block it takes only the commands, without the $ and without the output. From a diff it takes the new version: removed lines stay behind.
Languages
These languages are highlighted: Bash and Shell, C, C#, CSS, Diff, Docker, Go, GraphQL, HTML, INI, Java, JavaScript, JSON, JSX, Kotlin, Lua, Make, PHP, PowerShell, Python, Rust, SCSS, SQL, Swift, TOML, TSX, TypeScript, XML and YAML.
Type the name in lowercase, typescript or python, or a short form: ts, js, py, sh, zsh, yml, rs, cs, dockerfile, makefile, ps1. Any other language, such as C++ or Ruby, shows as plain code in the same band, with its name in the facts line. A page loads the highlighting only for the languages it shows, and none at all without code.
Line numbers are on by default. The setting Line numbers in the Post group turns them off for the whole site (see Custom settings).
Callouts
A callout card says what kind of hint it is by its colour. Type /callout on an empty line, choose Callout and pick a colour:
| Colour | Label |
|---|---|
| Blue | Note |
| Green | Tip |
| Yellow | Warning |
| Red | Danger |
The label stands above the text in capitals, in the colour of the rule on the left. Grey, white, pink, purple and the accent colour give a callout without a label, with a grey rule. In a release, the red callout says "Breaking change" instead of "Danger". The labels follow your site language (Translations).
Dates, updates and old posts
Posts, tutorial chapters, releases and incident notes show their date and time in your site's time zone, written the way developers write them: 2026-11-12 09:41 CET. TIL notes show the same stamp.
On posts, chapters, releases and incident notes, "updated 2026-11-15" follows the time once you saved the post at least seven days after publishing it. Ghost counts every save, also one that fixes a typo, so a typo fixed a month later shows as an update.
A post that is older than the setting Age warning (2 years by default, or 1 year, 3 years or off) gets a note under its meta line: "Written 3 years ago. Versions and commands may have moved on." Posts, tutorial chapters, releases, incident notes and TIL notes get it. Letters and pages don't. For a post that stays true, such as an essay or a list of principles, add the internal tag #evergreen, and the note stays away.
The note and "updated" are worked out in the reader's browser, so a page that a cache keeps for days still shows the right age.
What lists show
Every list in Logbuch shows an entry as one row: date and time on the left, then the type as a framed label in its colour, then the title, the excerpt and a line of facts.
| Type | Facts line |
|---|---|
| Post | reading time |
| Tutorial | the series' name, "Chapter 3 of 6", reading time |
| TIL | none: the note stands in full |
| Changelog | the version after the title, the count per section, breaking changes |
| Incident | status, severity, duration |
| Letter | "Letter 9", reading time |
The type comes from the internal tag. Without one, a post shows as Post, or as Tutorial when it has a series tag.
The three home page layouts (setting Homepage layout, see Custom settings) pick from the types differently:
| Layout | What it shows |
|---|---|
| Tutorials first | your series as cards, then the latest entries beside the five newest TIL notes |
| Log | every entry in order, with a line for each year and buttons to show one type only |
| Changelog | the newest version from your latest #changelog post, a status line from your latest #incident post, the five newest releases with the lines of their sections, grouped under each section's name and count, and beside them the three newest incidents and the three newest posts without a type |
The status line of the Changelog layout says "No open incidents" with the date and duration of the last one once your newest incident has #resolved, and "Open incident" with its title until then. A release without sections shows its excerpt instead of its lines.
The type buttons of the Log layout only filter the entries on the page the reader is looking at. For a list of all releases or all incidents across every page, add an archive per type (below).
Archives and feeds per type
Internal tags have no page and no RSS feed of their own. To give each type one, such as /releases/ with every release and /releases/rss/ as its feed, add a channel per type to Ghost's routes file. A channel lists posts without changing their addresses, so existing links keep working.
Save this as routes.yaml:
routes:
  /releases/:
    controller: channel
    filter: tag:hash-changelog
  /incidents/:
    controller: channel
    filter: tag:hash-incident
  /til/:
    controller: channel
    filter: tag:hash-til
  /letters/:
    controller: channel
    filter: tag:hash-newsletter

collections:
  /:
    permalink: /{slug}/
    template: index

taxonomies:
  tag: /tag/{slug}/
  author: /author/{slug}/
The lower part is Ghost's own default. Ghost writes internal tags as hash- in filters, so #changelog becomes hash-changelog. Leave out the types you don't use, and don't pick an address that one of your pages already has.
Upload the file in Ghost Admin under PLACEHOLDER. If you changed your routes before, download the current file there first and add the channels to it, because the file you upload replaces the old one.
Each channel lists its posts in the entry rows, page by page, and has its feed at its address plus rss/. Add the channels you want readers to find to your navigation, and link a feed such as /releases/rss/ where release readers will look for it. The feed link of the Changelog layout leads to your site's whole feed.
If you'd rather not touch the routes file, give every release a public tag such as Releases as well, as the Changelog demo does. Its tag page at /tag/releases/ lists them.
Overview pages for authors and tags
Logbuch has a page that lists all authors and one that lists all public tags, each with their number of posts. Ghost shows them when a page has the matching URL:
- Create a page with the title "Authors" and set its URL to
authors. Publish it. - Create a page with the title "Tags" and set its URL to
tags. Publish it.
The page shows its title and, if you wrote one, its excerpt above the list. Leave the text empty, because the theme fills the rest. The tags page shows your series first and then your other tags, each as a card with its description, its number of posts and its two newest entries. Internal tags such as #changelog never appear. The "All series" link of the Tutorials first layout leads to the tags page, so create it if you write series.
Newsletter design
Ghost builds the newsletter e-mails itself, and a theme can't change them. These values make the e-mail match Logbuch as closely as Ghost allows. Ghost offers a serif or a sans-serif font only, so the mono font of your site can't reach the e-mail. Go to Settings → Newsletters, click Edit next to your newsletter, and set them on two tabs.
The colours depend on your preset's colour scheme:
| Setting | Dev blog (Seekarte) | Homelab (Rost) | Changelog (Nebel) |
|---|---|---|---|
| Background color | #EDE9D9 | #EEE2D8 | #E4E4E0 |
| Post title color | #1B2230 | #2A1E1A | #202124 |
PLACEHOLDER (header_background_color) | #E3DECA | #E4D6CA | #D9D9D4 |
PLACEHOLDER (divider_color) | #CFC8B2 | #D3C2B4 | #C6C6C0 |
On the Content tab:
| Setting | Value |
|---|---|
| Publication title | on |
| Feature image | off |
| Add a link to your comments | on (only shown when comments are on) |
| Share your latest posts | on |
On the Design tab:
| Setting | Value |
|---|---|
| Heading font | Elegant serif |
| Body font | Elegant serif |
| Title alignment | left |
| Button corners | the square one, the first of the three |
These fields take a value as well:
| Setting | Value |
|---|---|
PLACEHOLDER (title_font_weight) | bold |
PLACEHOLDER (button_style) | outline |
PLACEHOLDER (button_color) | accent |
PLACEHOLDER (link_style) | underline |
PLACEHOLDER (link_color) | accent |
PLACEHOLDER (image_corners) | square |
PLACEHOLDER (section_title_color) | accent |
PLACEHOLDER (show_header_icon) | on |
PLACEHOLDER (show_header_name) | off |
PLACEHOLDER (show_post_title_section) | on |
PLACEHOLDER (show_excerpt) | on |
PLACEHOLDER (show_subscription_details) | off |
PLACEHOLDER (show_share_button) | off |
PLACEHOLDER (show_badge) | on |
Click Save.
The demo content sets all of these for its preset.